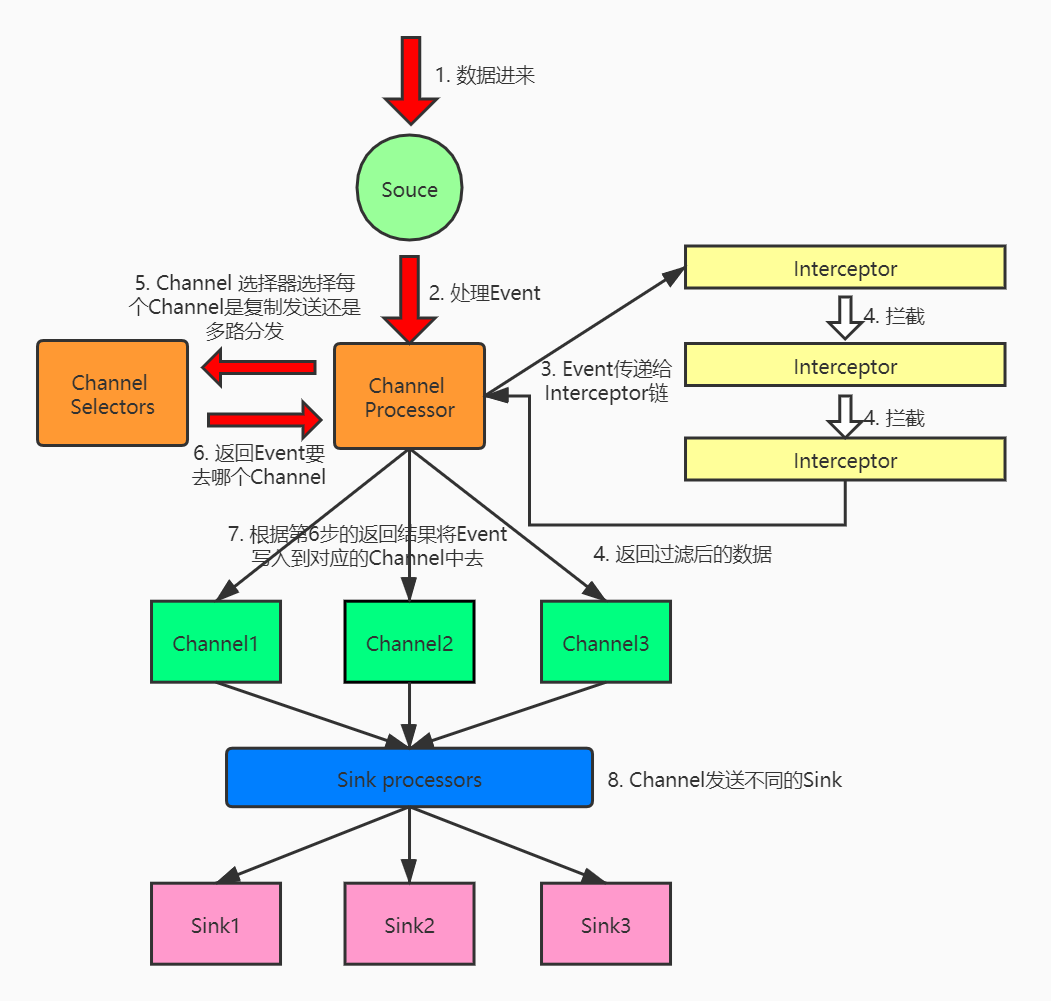
- Agent架构
- 自定义Source
- 自定义Sink
- 自定义Interceptor
- Channel的事物保证
Agent架构
自定义Source
提示:当不会写的时候,看源码是个不错的选择
在自定义Flume的组件之前, IDEA需要引入Flume的依赖
<dependency>
    <groupId>org.apache.flume</groupId>
    <artifactId>flume-ng-core</artifactId>
    <version>1.6.0</version>
</dependency>
|
Source的目的是从外部客户端接收数据并将其存储到配置的Channels中。一个Source可以获得它自己的ChannelProcessor的一个实例来连续处理一个Event,该Event在一个Channel本地事务中被提交。
在异常的情况下,所需的Channel将传播异常,所有Channel将回滚它们的Event,但之前在其他Channel上处理的Event将保持提交。
自定义Source可以在数据源里直接产生数据,产生的数据你可以定制化(前缀、后缀)
自定义Source类,参考官网demo/github
package tunan.hadoop.flume.sources;
import org.apache.flume.Context;
import org.apache.flume.EventDeliveryException;
import org.apache.flume.PollableSource;
import org.apache.flume.conf.Configurable;
import org.apache.flume.event.SimpleEvent;
import org.apache.flume.source.AbstractSource;
public class MySource extends AbstractSource implements Configurable, PollableSource {
private String prefix;
private String suffix;
@Override
public Status process() throws EventDeliveryException {
Status status = null;
for (int i = 0; i < 100; i++) {
SimpleEvent event = new SimpleEvent();
event.setBody((prefix + i + suffix).getBytes());
getChannelProcessor().processEvent(event);
}
try {
status = Status.READY;
} catch (Exception e) {
e.printStackTrace();
status = Status.BACKOFF;
}
try {
Thread.sleep(5000);
} catch (InterruptedException e) {
e.printStackTrace();
}
return status;
}
@Override
public void configure(Context context) {
this.prefix = context.getString("prefix","TUNAN");
this.suffix = context.getString("suffix");
}
}
|
将jar包上传到$FLUME_HOME/lib下,并修改配置文件中的Source,修改Type、添加类中自定义的参数
# Name the components on this agent
a1.sources = r1
a1.sinks = k1
a1.channels = c1

# 我们在类中自定义的Source参数和类的全限定名
a1.sources.r1.type = tunan.hadoop.flume.sources.MySource
a1.sources.r1.prefix = tunan:
a1.sources.r1.suffix = -6639

# Describe the sink
a1.sinks.k1.type = logger

# Use a channel which buffers events in memory
a1.channels.c1.type = memory
a1.channels.c1.capacity = 1000
a1.channels.c1.transactionCapacity = 100

# Bind the source and sink to the channel
a1.sources.r1.channels = c1
a1.sinks.k1.channel = c1
|
flume-ng agent \
--conf /home/hadoop/app/flume/conf \
--conf-file /home/hadoop/app/flume/script/MySource.conf \
--name a1 \
-Dflume.root.logger=INFO,console
|
查看结果

自定义Sink
提示:当不会写的时候,看源码是个不错的选择
Sink的目的是从Channel中提取Event并将它们转发到流中的下一个Flume Agent或将它们存储在外部存储库中。
正如在Flume属性文件中配置的那样,一个Sink仅与一个Channel相关联。
有一个与每个配置的Sink相关联的SinkRunner实例,当Flume框架调用SinkRunner.start()时,会创建一个新线程来驱动Sink(使用SinkRunner)。这个线程管理Sink的生命周期。Sink需要实现start()和stop()方法,它们是生命周期感知接口的一部分。start()方法应该初始化Sink,并使其处于可以将Event转发到下一个目的地的状态。process()方法应该执行从Channel中提取Event并转发Event的核心处理。stop()方法应该做必要的清理工作(例如释放资源)。
从Channel拿到数据(Event),把数据输出我们自定义的Sink中去,架构为:
nc source ==> memory channel ==> MySink
|
注意: nc可以保证消息有序,telnet不能保证消息有序
代码实现:
package tunan.hadoop.flume.sink;
import org.apache.flume.*;
import org.apache.flume.conf.Configurable;
import org.apache.flume.sink.AbstractSink;
import org.slf4j.Logger;
import org.slf4j.LoggerFactory;
public class MySink extends AbstractSink implements Configurable {
private static final Logger logger = LoggerFactory.getLogger(MySink.class);
private String prefix;
private String suffix;
@Override
public Status process() throws EventDeliveryException {
Status status;
Channel ch = getChannel();
Transaction txn = ch.getTransaction();
txn.begin();
try {
Event event;
do {
event = ch.take();
} while ((event == null));
String body = new String(event.getBody());
logger.error(prefix + body + suffix);
txn.commit();
status = Status.READY;
} catch (Throwable t) {
txn.rollback();
status = Status.BACKOFF;
if (t instanceof Error) {
throw (Error)t;
}
} finally {
txn.close();
}
return status;
}
@Override
public void configure(Context context) {
this.prefix = context.getString("prefix","Tunan");
this.suffix = context.getString("suffix");
}
}
|
jar包上传到$FLUME_HOME\lib下,并修改配置文件中的Sink,修改Type、添加类中自定义的参数
# Name the components on this agent
a1.sources = r1
a1.sinks = k1
a1.channels = c1
# Describe/configure the source
a1.sources.r1.type = netcat
a1.sources.r1.bind = localhost
a1.sources.r1.port = 44444
#
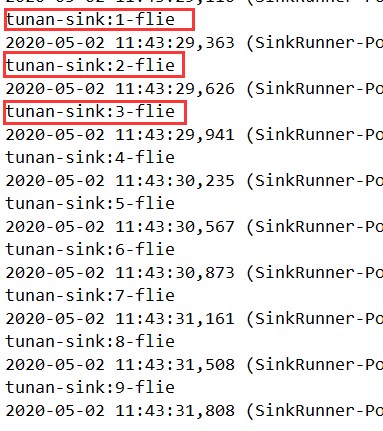
a1.sinks.k1.type = tunan.hadoop.flume.sink.MySink
a1.sinks.k1.prefix = tunan-sink:
a1.sinks.k1.suffix = -flie
# Use a channel which buffers events in memory
a1.channels.c1.type = memory
a1.channels.c1.capacity = 1000
a1.channels.c1.transactionCapacity = 100
# Bind the source and sink to the channel
a1.sources.r1.channels = c1
a1.sinks.k1.channel = c1
|
发送消息
[hadoop@hadoop ~]$ nc localhost 44444
1
OK
2
OK
3
OK
..
0
OK
|
查看结果
自定义Interceptor
提示:当不会写的时候,看源码是个不错的选择
Flume具有修改/删除运行中的Event的能力。这是在拦截器的帮助下完成的。拦截器是实现org.apache.flum .interceptor. interceptor接口的类。拦截器可以根据拦截器开发人员选择的任何标准修改甚至删除Event。
Flume支持链式的拦截器。这是通过在配置中指定拦截器builder类名列表来实现的。截取程序被指定为source配置中的空白分隔列表。指定拦截器的顺序与调用它们的顺序相同。一个拦截器返回的Event列表被传递到链中的下一个拦截器。
拦截器可以修改或删除Event。如果拦截器需要删除Event,它只会在其返回的列表中不返回该Event。如果它要删除所有Event,那么它只返回一个空列表。
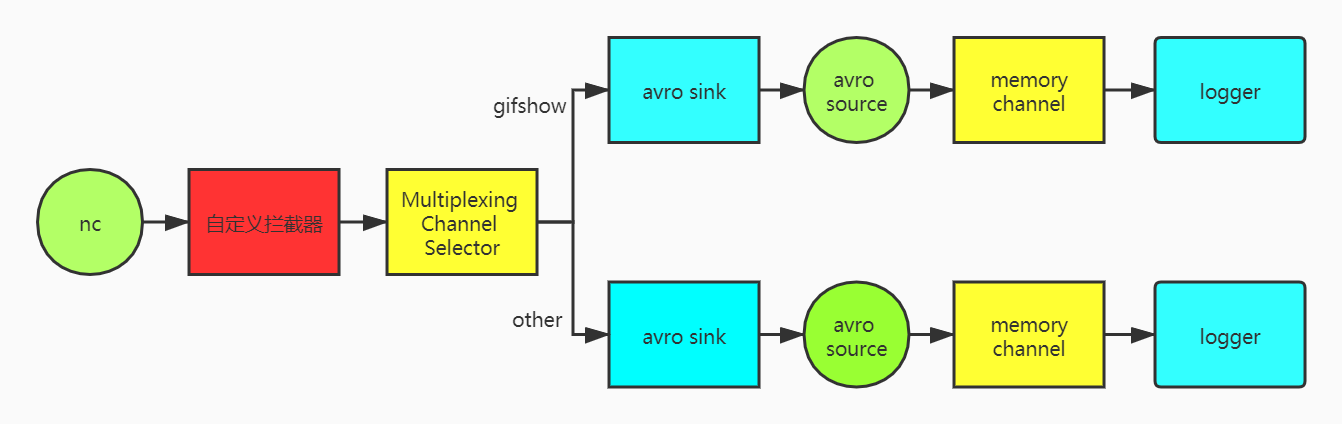
需求:Flume接进来的数据都在一起,有些业务线的数据比较重要,单独拉出来,这里自定义拦截器,并配合Multiplexing Channel Selector将body包含gifshow的数据单独拿出来
代码实现自定义拦截器
package tunan.hadoop.flume.interceptor;
import org.apache.flume.Context;
import org.apache.flume.Event;
import org.apache.flume.interceptor.Interceptor;
import java.util.ArrayList;
import java.util.Iterator;
import java.util.List;
import java.util.Map;
public class MyInterceptor implements Interceptor {
private List<Event> newEvents;
@Override
public void initialize()
{
newEvents = new ArrayList<>();
}
@Override
public Event intercept(Event event) {
Map<String, String> headers = event.getHeaders();
String body = new String(event.getBody());
if (body.contains("gifshow")) {
headers.put("type", "gifshow");
} else {
headers.put("type", "other");
}
return event;
}
@Override
public List<Event> intercept(List<Event> events) {
newEvents.clear();
Iterator<Event> iter = events.iterator();
while (iter.hasNext()){
Event next = iter.next();
newEvents.add(intercept(next));
}
return newEvents;
}
@Override
public void close() {
}
public static class Builder implements Interceptor.Builder{
@Override
public Interceptor build() {
return new MyInterceptor();
}
@Override
public void configure(Context context) {
}
}
}
|
配置第一个Agent
# Name the components on this agent
a1.sources = r1
a1.sinks = k1 k2
a1.channels = c1 c2

# Describe/configure the source
a1.sources.r1.type = netcat
a1.sources.r1.bind = localhost
a1.sources.r1.port = 44444

# 自定义拦截器
a1.sources.r1.interceptors = i1
a1.sources.r1.interceptors.i1.type = tunan.hadoop.flume.interceptor.MyIntercepto$Builder

# multiplexing selector
a1.sources.r1.selector.type = multiplexing
a1.sources.r1.selector.header = type
# 与自定义拦截器中设置的头信息对应
a1.sources.r1.selector.mapping.figshow = c1
a1.sources.r1.selector.mapping.other = c2

# Describe the sink
a1.sinks.k1.type = avro
a1.sinks.k1.hostname = hadoop
a1.sinks.k1.port = 4441

a1.sinks.k2.type = avro
a1.sinks.k2.hostname = hadoop
a1.sinks.k2.port = 4442

# Use a channel which buffers events in memory
a1.channels.c1.type = memory
a1.channels.c1.capacity = 1000
a1.channels.c1.transactionCapacity = 100

a1.channels.c2.type = memory
a1.channels.c2.capacity = 1000
a1.channels.c2.transactionCapacity = 100

# Bind the source and sink to the channel
a1.sources.r1.channels = c1 c2
a1.sinks.k1.channel = c1
a1.sinks.k2.channel = c2
|
配置第二个Agent
# Name the components on this agent
a1.sources = r1
a1.sinks = k1
a1.channels = c1

# Describe/configure the source
a1.sources.r1.type = avro
a1.sources.r1.bind = hadoop
a1.sources.r1.port = 4441

# Describe the sink
a1.sinks.k1.type = logger

# Use a channel which buffers events in memory
a1.channels.c1.type = memory
a1.channels.c1.capacity = 1000
a1.channels.c1.transactionCapacity = 100

# Bind the source and sink to the channel
a1.sources.r1.channels = c1
a1.sinks.k1.channel = c1
|
配置第三个Agent
# Name the components on this agent
a1.sources = r1
a1.sinks = k1
a1.channels = c1

# Describe/configure the source
a1.sources.r1.type = avro
a1.sources.r1.bind = hadoop
a1.sources.r1.port = 4442

# Describe the sink
a1.sinks.k1.type = logger

# Use a channel which buffers events in memory
a1.channels.c1.type = memory
a1.channels.c1.capacity = 1000
a1.channels.c1.transactionCapacity = 100

# Bind the source and sink to the channel
a1.sources.r1.channels = c1
a1.sinks.k1.channel = c1
|
启动Agent,先启动Agent2和Agent3,不然会报错
flume-ng agent \
--conf /home/hadoop/app/flume/conf \
--conf-file /home/hadoop/app/flume/script/Interceptor_3.conf \
--name a1 \
-Dflume.root.logger=INFO,console

flume-ng agent \
--conf /home/hadoop/app/flume/conf \
--conf-file /home/hadoop/app/flume/script/Interceptor_2.conf \
--name a1 \
-Dflume.root.logger=INFO,console

flume-ng agent \
--conf /home/hadoop/app/flume/conf \
--conf-file /home/hadoop/app/flume/script/Interceptor_1.conf \
--name a1 \
-Dflume.root.logger=INFO,console
|
发送消息
[hadoop@hadoop ~]$ nc localhost 44444
gifshow
OK
aaaaa
OK
aaaagifshow
OK
figshow
OK
|
查看结果


Channel的事物保证
Transaction interface 是Flume可靠性的基础,所有主要组件(即Source、Sink、Channel)必须使用Flume Transaction。
Transaction 在连接Channel中实现,连接到Channel的每个Source和Sink都必须获得一个Transaction 对象。
Source使用ChannelProcessor来管理Transaction ,而Sinks 通过其配置的Channel显式地管理Transaction。
每个阶段的操作Event(将其放入Channel中)或提取Event(将其从Channel中取出)的操作在活动必须在Transaction中完成。
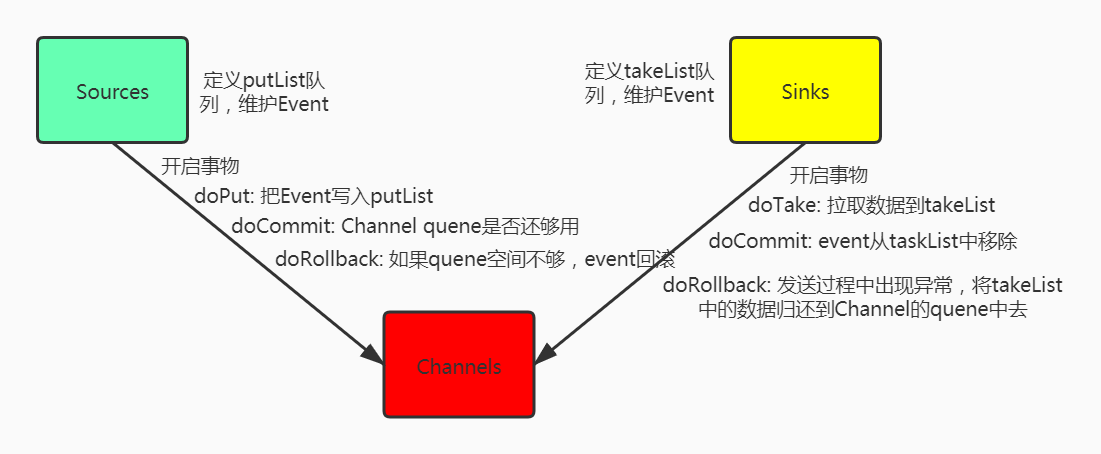
所有的事物管理由MemoryChannel类来做,具体可以查看源码
